
Cocotb (Coroutine Cosimulation Testbench) is a testbench environment for verifying RTL code using Python. It provides several other benefits over the current, more widely adopted choices, and can greatly assist with FPGA development.
First introduced in 2013, cocotb is still relatively new, and may not be familiar to many FPGA designers. SystemVerilog and UVM being the current ASIC and FPGA verification methodologies of choice, the creators of cocotb have come up with a seemingly superior alternative.
As verification methodologies go, SystemVerilog and UVM present several disadvantages, not the least of which being they are large, complex, and require specialized knowledge. Both come with a steep learning curve, and require significant time to create test benches, as well as expensive toolchains. SystemVerilog can be difficult to read and understand compared with Python, as SystemVerilog is not a common language based on IEEE top programming languages 2017.
Cocotb, in contrast to System Verilog and UVM, offers several advantages. The open source verification network reduces overhead in creating testbenches alongside the following benefits:
Python is a popular language, and one of the easiest to understand, which opens the door to many more engineers being able to quickly grasp and use cocotb.
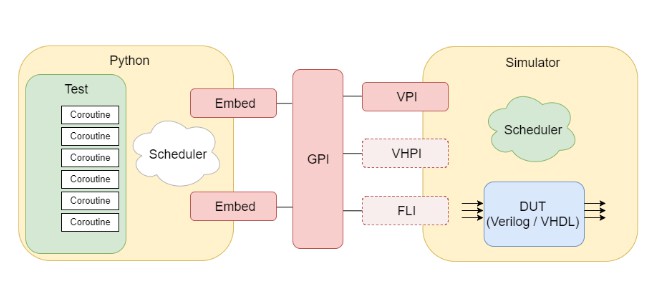
An introduction to cocotb can be found here.
Cocotb is officially supported and tested on Linux based systems. These include Linux Mint, Redhat, and distributions based on Redhat or Ubuntu. The installations include a Windows 7 installation, but these are not the best options on Windows 10.
To install cocotb on Windows 10, this GitHub comment thread found here was helpful.
Here are more detailed instructions.
pacman -S git makeconda install mingw libpython
export PATH=/c/questasim64_10.6/win64:$PATH

export PATH=/c/Users/juanmorales/Documents/Docs/Anaconda3:$PATH

export PATH=/c/Users/juanmorales/Documents/Docs/Anaconda3/Scripts:$PATH

export PATH=/c/TDM-GCC-64/bin:$PATH
The next step is to test out the cocotb under MSYS2.
cd /c/GIT/cocotb/examples/adder/tests

make SIM=questa clean

make SIM=questa GUI=1 TOPLEVEL_LANG=vhdl
A log file is saved under sim_build/transcript in the tests directory.
At this time cocotb simulation is kind of flakey. MSYS2 console shows “ERROR: called callback function returned NULL. Failed to execute callback”. Transcript console shows “Simulation halt requested by foreign interface” before cocotb has a chance to display test results.
If simulation ends before results are displayed, rerun the make command to launch simulation again.
make SIM=questa GUI=1 TOPLEVEL_LANG=vhdl

Here’s a snippet of the simulation loading the FLI interface.
# Loading libfli.dll

# 0.00ns INFO cocotb.gpi gpi_embed.c:248 in embed_sim_init Running on ModelSim for Questa-64 version 10.6 2016.12

# 0.00ns INFO cocotb.gpi gpi_embed.c:249 in embed_sim_init Python interpreter initialised and cocotb loaded!

# 0.00ns INFO cocotb __init__.py:115 in _initialise_testbench Running tests with Cocotb v1.0 from C:/GIT/cocotb

# 0.00ns INFO cocotb __init__.py:131 in _initialise_testbench Seeding Python random module with 1502896511

# 0.00ns INFO cocotb.regression regression.py:167 in initialise Found test test_adder.adder_basic_test

# 0.00ns INFO cocotb.regression regression.py:167 in initialise Found test test_adder.adder_randomised_test

# 0.00ns INFO cocotb.regression regression.py:287 in execute Running test 1/2: adder_basic_test

# 0.00ns INFO ..outine.adder_basic_test.0x62089e8 decorators.py:191 in send Starting test: "adder_basic_test"

# Description: Test for 5 + 10

Here’s a snippet of a bad simulation run. Simulation halts before test results are displayed.
run -all

# 4.00ns INFO cocotb.adder test_adder.py:25 in adder_basic_test Ok!

# 5.00ns INFO cocotb.regression regression.py:223 in handle_result Test Passed: adder_basic_test

# 5.00ns INFO cocotb.regression regression.py:287 in execute Running test 2/2: adder_randomised_test

# 5.00ns INFO ..e.adder_randomised_test.0x62461d0 decorators.py:191 in send Starting test: "adder_randomised_test"

# Description: Test for adding 2 random numbers multiple times

# 9.00ns INFO cocotb.adder test_adder.py:47 in adder_randomised_test Ok!

# 11.00ns INFO cocotb.adder test_adder.py:47 in adder_randomised_test Ok!

# 13.00ns INFO cocotb.adder test_adder.py:47 in adder_randomised_test Ok!

# 15.00ns INFO cocotb.adder test_adder.py:47 in adder_randomised_test Ok!

# 17.00ns INFO cocotb.adder test_adder.py:47 in adder_randomised_test Ok!

# 19.00ns INFO cocotb.adder test_adder.py:47 in adder_randomised_test Ok!

# 21.00ns INFO cocotb.adder test_adder.py:47 in adder_randomised_test Ok!

# 23.00ns INFO cocotb.adder test_adder.py:47 in adder_randomised_test Ok!

# 25.00ns INFO cocotb.adder test_adder.py:47 in adder_randomised_test Ok!

# 27.00ns INFO cocotb.adder test_adder.py:47 in adder_randomised_test Ok!

# Simulation halt requested by foreign interface.

Here’s a snippet of a good simulation run. Simulation halts after test results are displayed.
# 4.00ns INFO cocotb.adder test_adder.py:25 in adder_basic_test Ok!

# 5.00ns INFO cocotb.regression regression.py:223 in handle_result Test Passed: adder_basic_test

# 5.00ns INFO cocotb.regression regression.py:287 in execute Running test 2/2: adder_randomised_test

# 5.00ns INFO ..e.adder_randomised_test.0x6246198 decorators.py:191 in send Starting test: "adder_randomised_test"

# Description: Test for adding 2 random numbers multiple times

# 9.00ns INFO cocotb.adder test_adder.py:47 in adder_randomised_test Ok!

# 11.00ns INFO cocotb.adder test_adder.py:47 in adder_randomised_test Ok!

# 13.00ns INFO cocotb.adder test_adder.py:47 in adder_randomised_test Ok!

# 15.00ns INFO cocotb.adder test_adder.py:47 in adder_randomised_test Ok!

# 17.00ns INFO cocotb.adder test_adder.py:47 in adder_randomised_test Ok!

# 19.00ns INFO cocotb.adder test_adder.py:47 in adder_randomised_test Ok!

# 21.00ns INFO cocotb.adder test_adder.py:47 in adder_randomised_test Ok!

# 23.00ns INFO cocotb.adder test_adder.py:47 in adder_randomised_test Ok!

# 25.00ns INFO cocotb.adder test_adder.py:47 in adder_randomised_test Ok!

# 27.00ns INFO cocotb.adder test_adder.py:47 in adder_randomised_test Ok!

# 28.00ns INFO cocotb.regression regression.py:223 in handle_result Test Passed: adder_randomised_test

# 28.00ns INFO cocotb.regression regression.py:176 in tear_down Passed 2 tests (0 skipped)

# 28.00ns INFO cocotb.regression regression.py:341 in _log_test_summary

# ******************************************************************************************

# ** TEST PASS/FAIL SIM TIME(NS) REAL TIME(S) RATIO(NS/S) **

# ******************************************************************************************

# ** test_adder.adder_basic_test PASS 5.00 4.73 1.06 **

# ** test_adder.adder_randomised_test PASS 23.00 0.01 1915.28 **

# ******************************************************************************************

# 28.00ns INFO cocotb.regression regression.py:358 in _log_sim_summary

# *************************************************************************************

# ** ERRORS : 0 **

# *************************************************************************************

# ** SIM TIME : 28.00 NS **

# ** REAL TIME : 4.76 S **

# ** SIM / REAL TIME : 5.88 NS/S **

# *************************************************************************************

# 28.00ns INFO cocotb.regression regression.py: in tear_down Shutting down...

# Simulation halt requested by foreign interface.
For a good simulation run, there is a summary printed out at the end. The test name, pass/fail status, sim time (ns), real time (s), and ratio(ns/s) are printed out.
For the adder simulation, there are two test. The first test is “test_adder.adder_basic_test” with a PASS status. It took 5.00 ns of sim time and 4.73 seconds of real time for a ratio of 1.06 ns/s. The second test is “test_adder.adder_randomised_test” with a PASS status. It took 23.00 ns of sim time and 0.01 seconds of real time for a ratio of 1915.28 ns/s.
An summary of total errors, sim time (ns), real time (s), and ratio (ns/s) is printed after all test run. For the adder simulation, there are 0 errors. Sim time is 28.00 ns and real time of 4.76 seconds for a ratio of 5.88 ns/s. The simulation then shuts down.
Now that cocotb is running properly under Windows 10, the next step is to dive into cocotb itself. Documentation is provided in the cocotb git repo cloned earlier. To build the documentation in HTML format, follow these steps:
conda install sphinxcd /c/GIT/cocotb/documentation
make html
From index.html, you can explore the wealth of documentation that comes with cocotb. There is a good overview of the test frame as well as several tutorials to help illustrate cocotb’s features.
Additional information on cocotb can be found on the project’s GitHub page at https://github.com/potentialventures/cocotb. There, you can read more documentation, raise a bug, request feature enhancements, join the mailing list, email the developers, or follow the project on Twitter.