seL4 is a formally verified microkernel that was built with security and performance in mind. It is a very attractive software solution for projects that have rigorous security and/or safety requirements. While this is a great option, one of the drawbacks is that there is less built around it than other, more mature solutions, such as a traditional OS. For example, seL4 doesn’t work on that many platforms and it doesn’t have many drivers developed.
DornerWorks is trying to mitigate this by building up the ecosystem around seL4 and giving developers the tools they need to use seL4 for their systems. One way we are building up this ecosystem is by porting seL4 to more platforms that can really take advantage of its benefits.
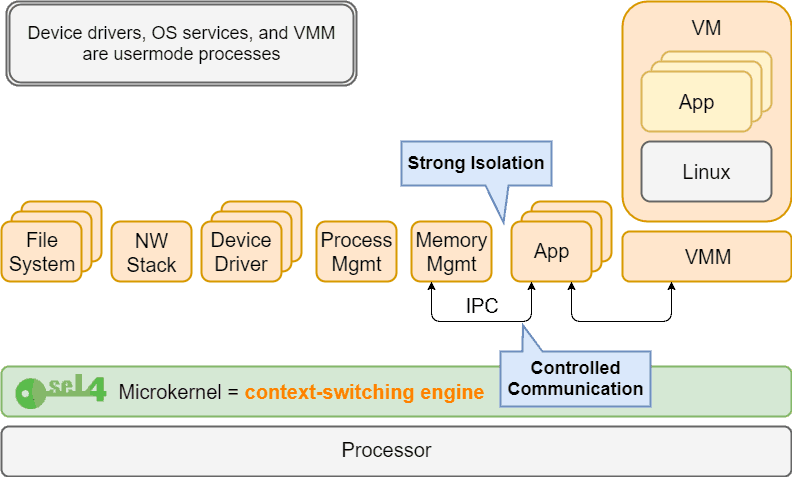
The Zynq UltraScale+ is a Multi-Processor System on a Chip that has a quad-core Cortex-A53, a dual-core Cortex-R5, a GPU, and an FPGA. This chip is AMD’s most secure solution yet, with features like Secure Boot, AMD Memory Protection Unit (XMPU), and AMD Peripheral Protection Unit (XPPU). With this in mind, the Zynq UltraScale+ MPSoC is a great match for the seL4 microkernel. These secure hardware components provided by AMD and the formally verified seL4 microkernel pair together well by ensuring the hardware and software collaborate in the overall security story. On top of that, it also provides the ARM virtualization extensions.
This support allows seL4 to be run as a Hypervisor, which is another means to reinforce the budding seL4 ecosystem, by allowing guest operating systems to run on top of seL4.
To port seL4 to a new platform, we needed to make modifications to the following repositories:
seL4 already worked on the previous generation Zynq platform, the Zynq-7000. We used this platform as a starting point for our work on the Zynq UltraScale+. This platform shares some the same peripherals with the Zynq UltraScale+, which made the porting effort a little easier.
Some of the files that were originally in a platform folder for the Zynq-7000 were moved to a machine folder for the common Zynq machine. But, we had to be very careful with this practice because there were some subtle differences, such as the TTC timers having a different register width between the two platforms. Also, some register base addresses and interrupt numbers differed between the platforms as well.
We started our work on the seL4_tools repository because that was needed to build our new platform and to boot the whole system. Next, we moved on to the kernel itself and added all of the register addresses and interrupts. After that, we added support for timers, the main clock, and two UARTs. Finally, we added a
defconfig to sel4test to select our new platform for building.
Afterwards, we tested a simple CAmkES application to verify that CAmkES works on the platform.
A large portion of the porting effort was pretty straight forward, but there were a couple of interesting issues that we encountered. These issues were mostly due to elfloader, the tool that loads and runs the seL4 kernel.
For example, the elfloader calculated the physical to virtual offset as a 32-bit unsigned integer for all architectures. If the physical address was less than the virtual address then the offset would get truncated on 64-bit architectures. We fixed this by making the size of that variable dependent on the size of the architecture.
Another issue we ran into was that seL4 doesn’t want to enable the floating point coprocessor, but the elfloader was attempting to use floating point registers. This isn’t an issue when booting with U-Boot, which enables the floating point coprocessor by default, but there may be some configurations where you don’t want U-Boot. To fix this, we modified the compiler flags for both 64-bit and 32-bit ARM builds of the elfloader to not use floating point registers.
We only scratched the surface of support for this porting effort. We only provided support for the bare minimum of devices needed for sel4test to run successfully. So more devices can be mapped into the kernel and drivers for those devices can be provided to the util_libs and seL4_libs repositories. Also, camkes-arm-vm could be ported so that developers can run Linux on top of seL4 on the Zynq UltraScale+ MPSoC.
The main goal of the Zynq UltraScale+ MPSoC port was to expand the seL4 ecosystem and give developers more options. So it is more useful if people are actually able to try out our work. Follow the instructions below to run it on your own ZCU102 development board.
These instructions assume you have AMD SDK and Petalinux v2016.4 installed: AMD Downloads
$ mkdir sel4test && cd sel4test
$ repo init \
-u https://github.com/seL4/sel4test-manifest \
-m default.xml
$ repo sync
$ make zynqmp_aarch64_debug_xml_defconfig
$ make
These instructions are for JTAG, but we have also booted from an SD Card and QSPI.
proc run {fsbl uboot atf image_bin image_addr} {
# Reset Processor
targets -set -nocase -filter {name =~"*A53*0"}
rst -processor

# Download and run First Stage BootLoader
dow $fsbl
con
after 5000
stop

dow $image_bin
dow $uboot
dow $atf
con
}

# Set file locations
set uboot ./u-boot.elf
set fsbl ./zynqmp_fsbl.elf
set atf ./bl31.elf
set image_bin ./images/sel4test-driver-image-arm-zynqmp
set image_addr 0x10000000

connect -url tcp:127.0.0.1:3121
after 1000
run $fsbl $uboot $atf $image_bin $image_addr
$ xsdb boot-64.tcl
ZynqMP> go 0x10000000
You should see output from the tests and a final report that should say that all tests pass.
All is well in the universe.
Since our boot method for 32-bit doesn’t use a full AMD software stack, it does exhibit some inconsistent
behavior and may require updates to the platform’s FSBL to resolve, such as modifying the default clock value.
$ make clean
$ make zynqmp_aarch32_debug_xml_defconfig
$ make
$ arm-linux-gnueabi-objcopy -O binary \
images/sel4test-driver-image-arm-zynqmp \
images/sel4test-driver-image-arm-zynqmp.bin
A bootloader is needed to configure the peripherals for the Z US+. Especially to configure the DDR controller so
seL4 has access to all of the RAM.
i. File -> New… -> Application Project
a. Project Name: seL4_FSBL
b. Hardware Platform: ZCU102-ES2_HW_Platform
c. Compiler: 32-bit
ii. Click Next button
iii. Select Zynq MP FSBL
iv. Click Finish button
v. XSDK will automatically build the image
These instructions are for JTAG, but we have also booted from an SD Card and QSPI.
proc run {fsbl utils image_bin image_addr} {
# Set to 32-bit Mode
source $utils
targets -set -nocase -filter {name =~"APU*"}
enable_a32_mode 0

# Reset Processor
targets -set -nocase -filter {name =~"*A53*0"}
rst -processor

# Download and run First Stage BootLoader
dow $fsbl
con
after 5000
stop

# Download and run seL4Test
dow -data $image_bin $image_addr
con -addr $image_addr
}

# Set file locations
set utils /opt/Xilinx/SDK/2016.4/scripts/sdk/util/zynqmp_utils.tcl
set fsbl ./workspace/seL4_FSBL/Debug/seL4_FSBL.elf
set image_bin ./images/sel4test-driver-image-arm-zynqmp.bin
set image_addr 0x10000000
connect -url tcp:127.0.0.1:3121
after 1000
run $fsbl $utils $image_bin $image_addr
xsdb boot.tcl
You should see output from the tests and a final report that should say that all tests pass.
All is well in the universe.
Security is a growing concern in all embedded markets. SeL4 running on the Zynq UltraScale+ MPSoC is a
great solution due to the formal proof of seL4 and the security features provided by the Zynq UltraScale+.
DornerWorks is always looking to provide the best security solutions and will continue to look for ways to improve the seL4 ecosystem. We hope you get some use out of this port.