
As software developers, we get very comfortable with our workflows. These workflows can be personal preferences or developed from different project requirements. Changes to these workflows can be frustrating and end up distracting from the project at hand.
Most microcontroller ecosystems utilize their own IDE and project files in order to build projects. This can be a convenient way to start with a microcontroller, but often introduces unwanted workflow changes. Unfamiliar text editors, obfuscated build processes, and unknown compilers are some common trade-offs when it comes to using a vendor's IDE and build system. Open-source build tools can replace the embedded target's IDE allowing a developer to gain a more robust, familiar, and repeatable text based build system across a team.
CMake is well-suited for cross-platform embedded projects because it allows for custom commands designed specifically for your embedded target while maintaining its native build tool management method.
The microcontroller I will be targeting in these examples is the TI TM4C123G, which uses an ARM Cortex-M4F. Results may vary across microcontroller manufacturers but the same ideas should apply with some tinkering.
All example projects can be found at https://github.com/dornerworks/embeddedCmakeExamples.
Before jumping straight into the embedded projects it would be useful to briefly cover some CMake basics. Included in the projects repo is basePrj. This is nothing more than a hello world library and main file built with CMake. This is the project that we are going to build on for our embedded target.
Here is the project file layout:
basePrj/
├── CMakeLists.txt
├── libs
│   └── hello
│       ├── CMakeLists.txt
│       ├── inc
│       │   └── hello.h
│       └── src
│           └── hello.c
└── src
    └── main.c
And here is the top level CMake file:
cmake_minimum_required(VERSION 3.11.1)

project(basePrj)

add_subdirectory(libs/hello)

set(SOURCES src/main.c)

add_executable(${PROJECT_NAME} ${SOURCES})
target_link_libraries(${PROJECT_NAME} hello)
To build and run the project, run these commands:
$ cd basePrj
$ mkdir build
$ cd build
$ cmake ..
$ make
$ ./basePrj
Hello World!
Each microcontroller will have different required supporting files needed to execute code on target. Different targets will also require specific compilers and flags. I have found that the easiest way to find all of these requirements is to create a test project within the microcontroller's IDE.
Back to our example, we can create a new project in TI's Code Composer Studio and select our desired gcc-based compiler. This project generates tm4c123gh6pm_startup_ccs_gcc.c which contains required startup code for the microcontroller and tm4c123gh6pm.lds which is a linker script for gcc. These files will be used later by CMake. Now we need to build the project in debug and release modes noting the build and linking output.
Here we have the IDE debug mode output of the test program.
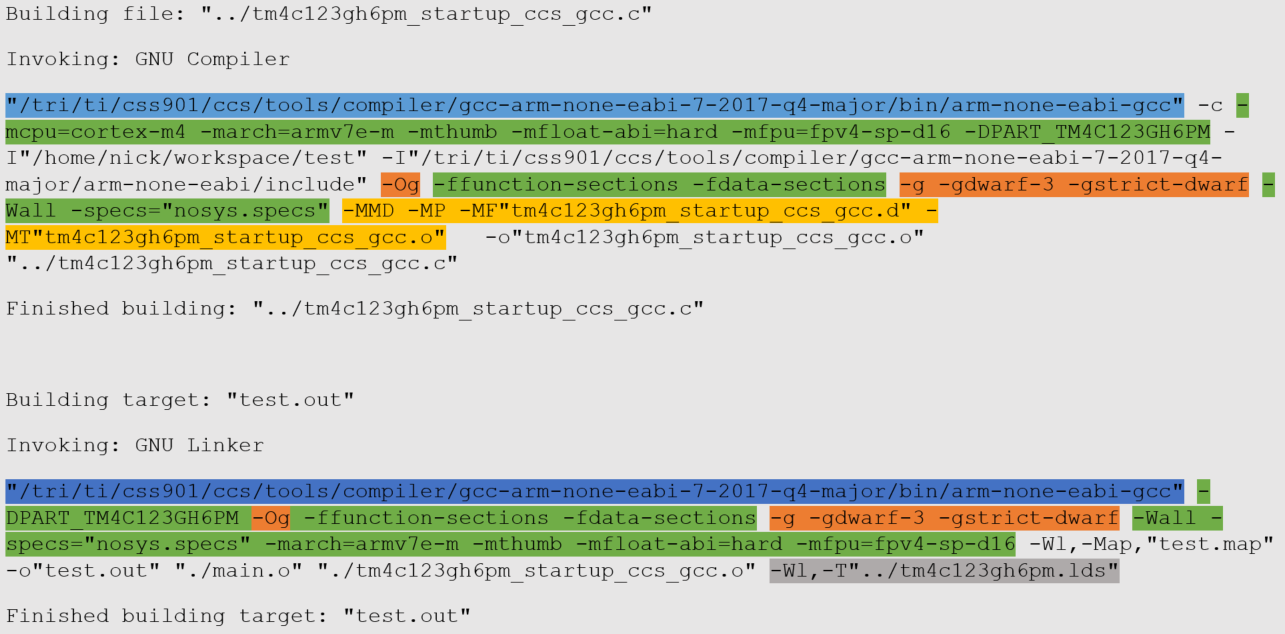
Now we can use this output to make our CMake commands:
  set(CMAKE_SYSTEM_NAME Generic)
  set(CMAKE_SYSTEM_PROCESSOR arm)
  set(CMAKE_CROSSCOMPILING 1)
  set(GCC_PATH
  /tri/ti/css901/ccs/tools/compiler/gcc-arm-none-eabi-7-2017-q4-major/bin)
  set(CMAKE_C_COMPILER ${GCC_PATH}/arm-none-eabi-gcc CACHE PATH "" FORCE)
Note: GCC_PATH will need to change per system so a relative path with a sourceable script may work better for a multiuser code base.
  set(CMAKE_C_FLAGS "-mcpu=cortex-m4 -march=armv7e-m -mthumb -mfloat-abi=hard
  -mfpu=fpv4-sp-d16 -DPART_TM4C123GH6PM -ffunction-sections -fdata-sections
  -Wall -specs=\"nosys.specs\"")
-0s). This information is stored in these commands:
  set(CMAKE_C_FLAGS_RELEASE "-Os")
  set(CMAKE_C_FLAGS_DEBUG "-Og -g -gdwarf-3 -gstrict-dwarf")
set(CMAKE_EXE_LINKER_FLAGS "-Wl,-T\"../tm4c123gh6pm.lds\"")
All of the build and linking output from the IDE has now been converted into CMake commands. However the ELF file these commands produce results in the embedded target beginning execution at garbage addresses when using a debugger. This is because sometimes the IDE makes assumptions about how debuggers or other tools will be used with the resulting build output. In this example, we need to specify an entry point at ResetISR for our linker so the target knows where to begin execution. This is where you may need to do some tinkering with you're target's build system. Here is our updated linker variable:
set(CMAKE_EXE_LINKER_FLAGS "--entry ResetISR -Wl,-T\"../tm4c123gh6pm.lds\"")
Bringing all of these CMake commands results in this top level CMakeLists.txt.
cmake_minimum_required(VERSION 3.11.1)

project(targetPrj)

set(CMAKE_SYSTEM_NAME Generic)
set(CMAKE_SYSTEM_PROCESSOR arm)
set(CMAKE_CROSSCOMPILING 1)

set(GCC_PATH
/tri/ti/css901/ccs/tools/compiler/gcc-arm-none-eabi-7-2017-q4-major/bin)

set(CMAKE_C_COMPILER ${GCC_PATH}/arm-none-eabi-gcc CACHE PATH "" FORCE)

set(SOURCES src/main.c src/tm4c123gh6pm_startup_ccs_gcc.c)

set(CMAKE_C_FLAGS "-mcpu=cortex-m4 -march=armv7e-m -mthumb -mfloat-abi=hard
-mfpu=fpv4-sp-d16 -DPART_TM4C123GH6PM -ffunction-sections -fdata-sections -Wall
-specs=\"nosys.specs\"")

set(CMAKE_C_FLAGS_RELEASE "-Os")
set(CMAKE_C_FLAGS_DEBUG "-Og -g -gdwarf-3 -gstrict-dwarf")
set(CMAKE_EXE_LINKER_FLAGS "--entry ResetISR -Wl,-T\"../tm4c123gh6pm.lds\"")

add_subdirectory(libs/hello)

add_executable(${PROJECT_NAME}.elf ${SOURCES})
target_link_libraries(${PROJECT_NAME}.elf hello)
With these changes we can now build and link an ELF file for our embedded target.
Before we can flash our microcontroller we will need to use objcopy to convert our ELF into a binary file. We could do that as a manual step after building but why not bake it into a CMake command? The following lines automatically create a binary file after building the ELF.
set(CMAKE_C_OBJCOPY ${GCC_PATH}/arm-none-eabi-objcopy CACHE PATH "" FORCE)

add_custom_target(${PROJECT_NAME}.bin ALL DEPENDS ${PROJECT_NAME}.elf)
add_custom_command(TARGET ${PROJECT_NAME}.bin
    COMMAND ${CMAKE_C_OBJCOPY} ARGS -O binary ${PROJECT_NAME}.elf ${PROJECT_NAME}.bin)
Here's some notes on the added command:
CMAKE_C_OBJCOPY.DEPENDS specifies the dependency of the target to the ELF file.ALL specifies that this target is to be run automatically with make.Now, each build automatically creates a binary file for our microcontroller.
Another useful CMake trick is to make a flash command to automatically flash our target for us. This step will largely rely on your board's desired flashing method. Luckily my setup uses JTAG for flashing and debugging. I am using a SEGGER JLink so I can use the JLinkExe command and a JLink commander script to flash the board. My commander script, flash.jlink, will need to be modified to work with other microcontrollers using JLink.
add_custom_target(flash DEPENDS ${PROJECT_NAME}.bin)
add_custom_command(TARGET flash
    USES_TERMINAL
    COMMAND JLinkExe -CommanderScript ../flash.jlink)
Here are some notes on the added command:
USES_TERMINAL so we can see the output from theJLinkExe command.Now, after having built the binary, running make flash will automatically flash the target.
Note: At this point in the example you won't see any output from the board because there are no communication protocols setup in this simple example. Debugging will show that the code is executing.
Our last custom CMake command for our embedded target will automatically launch a debugging session on our target. Before jumping straight into CMake commands it is a good idea to understand how to debug manually. Debugging our target is again done with the SEGGER JLink, this time using JLinkGDBServer and arm-none-eabi-gdb. These tools are require top be run in two separate terminals.
Here are the steps to debug our target:
  $ cd targetPrj
  $ mkdir debug
  $ cd debug
  $ cmake -DCMAKE_BUILD_TYPE=Debug ..
  $ make
$ JLinkGDBServer -if JTAG -device TM4C123GH6PM
GCC_PATH from the CMakeLists.txt, targeting the ELF file.
$ /tri/ti/css901/ccs/tools/compiler/gcc-arm-none-eabi-7-2017-q4-major/bin/arm-none-eabi-gdb targetPrj.elf
  (gdb) target remote :2331
  Remote debugging using :2331
  0x0000067a in exit ()
  (gdb) mon reset
  Resetting target
  (gdb) load
  Loading section .intvecs, size 0x26c lma 0x0
  Loading section .text, size 0x210c lma 0x280
  Loading section .rodata, size 0x18 lma 0x238c
  Loading section .eh_frame, size 0x4 lma 0x23a4
  Loading section .data, size 0x844 lma 0x23a8
  Loading section .ARM.exidx, size 0x8 lma 0x2bec
  Start address 0x604, load size 11232
  Transfer rate: 219 KB/sec, 1872 bytes/write.
These steps can be captured in a custom CMake command using xterm to run both tools in their own terminals:
set(CMAKE_C_GDB ${GCC_PATH}/arm-none-eabi-gdb CACHE PATH "" FORCE)

add_custom_target(gdb DEPENDS ${PROJECT_NAME}.elf)
add_custom_command(TARGET gdb
    COMMAND xterm -e JLinkGDBServer -if JTAG -device TM4C123GH6PM &
    COMMAND xterm -e ${CMAKE_C_GDB} ${PROJECT_NAME}.elf -x ../gdbInit &)
Note: The -x ../gdbInit option was added to GDB to automatically run the target remote :2331, mon reset, and load commands on boot. The mon reset and load commands can be run again from inside GDB to reset the target.
Now running make gdb will open a debugging session connected to our target.
Hopefully this blog has given you some ideas on how CMake can be used to transition embedded projects away from a target's IDE to support your team's desired workflows. DornerWorks is focused on working alongside our customers to maintain their desired workflows and quality standards. Whatever tools our customers use or how they use them, our flexibility and knowledge of embedded systems helps them efficiently create and improve their projects throughout the entire project life cycle without needing to abandon tried and true development methods.