Home / Microchip / Enable Innovation on the Microchip PolarFire SoC / seL4 Test on the Polarfire SoC
Use the repo tool to get the code from a manifest and start building:
mkdir sel4test
cd sel4test
repo init -u https://github.com/dornerworks/sel4test-manifest -b polarfire -m master.xml
repo sync
These instructions will download the tools and code required to build the seL4 kernel and the seL4 test suite. This directory will be referred to as the workspace.
The manifest does not, however, install a toolchain to build the code. For this, Data 61 does maintain a Docker image that contains all of the necessary development packages and cross compiling toolchains.
Clone this repository into the tools directory of your workspace:
git clone https://github.com/SEL4PROJ/seL4-CAmkES-L4v-dockerfiles tools/DockerFiles
If you would also like to build a bootable SD card, the following packages need to be added to the apt-get command in extras.dockerfile in order to build u-boot:
and the following line needs to be appended at the end:
RUN pip install kconfiglib
I like to create a script in the root of my workspace called container-env.sh that has the following contents:
#!/bin/bash

DOCKER_PATH="./tools/DockerFiles"
pwddir="$(pwd)"
host_dir="${pwddir// /\\ }"
image_name=$(whoami)-sel4-riscv

# Removing the requirement for a stack group from haskell, we're not using haskell
if [ $(grep "\-\-group-add stack" tools/DockerFiles/Makefile | wc -l) -ge 0 ]; then
    sed -i "/--group-add stack/d" tools/DockerFiles/Makefile
fi

function doc () {
    echo "seL4 Docker Development Environment"
    echo "-----------------------------------"
    echo "Loaded Functions: "
    echo " [1] start-container"
    echo "      Doc: Drop to an interactive shell in the containerized development environment"
    echo "       Ex:    Interactive shell: start-container"
    echo " [2] container-command [\"command\"]"
    echo "       Doc: Run the command in quotes inside of the container and exit"
    echo "       Ex:   Run a command: container-command \"/host/run-build.sh -p polarfire\""
}

function start-container() {
    make -C ${DOCKER_PATH} user_sel4-riscv \
         USER_IMG=${image_name} \
         HOST_DIR=$(pwd)
}

function container-command () {
    if [[ $# == 0 ]]; then
        echo "Error: Must provide a command"
        doc
    else
        make -C ${DOCKER_PATH} user_sel4-riscv \
             USER_IMG=${image_name} \
             HOST_DIR=$(pwd) \
             EXEC="bash -c '""$@""'"
    fi
}

if [ -d ${DOCKER_PATH} ]; then
    doc
else
    echo "Your containerized environment does not seem to be installed at ${DOCKER_PATH}"
    echo "Please install it there"
fi
I like to open two terminals at this point. In this situation, I can have my container environment in one terminal and my development tools on my host machine accessible in the other. In the terminal that the container-env.sh file was sourced, run the start-container command. You should be dropped into a shell prompt, where you should also see the directory structure of your workspace.
Here, we will create a build directory and call the init-build.sh script to configure and kick off the build:
mkdir build-polarfire
cd build-polarfire
../init-build.sh \
  -DPLATFORM=polarfire \
  -DSIMULATION=FALSE \
  -DElfloaderImage=binary \
  -DSel4testAllowSettingsOverride=True \
  -DLibSel4PlatSupportUseDebugPutChar=OFF \
  -DCMAKE_BUILD_TYPE=Debug \
  -DKernelDebugBuild=ON \
  -DRELEASE=False \
  -DKernelVerificationBuild=OFF \
  -DKernelPrinting=ON \
  -DRISCV64=TRUE \
  -DSel4testHaveTimer=OFF
ninja
If you also want to build a bootable SD card, add the following line to the command:
-DUseBootEnv="hss u-boot"
The image will now be located in <Workspace Root>/build-polarfire/images/sel4test-driver-image-riscv-polarfire. The image that is created is actually the elfloader, kernel, and user space sel4test application all rolled into one. This is not a bootable image just yet though.
To run on the Renode emulator, we have to build a slightly different version of our image. The bootloader used on the board is a little more advanced and not yet directly supported by the seL4 build system. However, the Berkly Bootloader (BBL) is. Create a new build directory and run the same init-build.sh command as before but this time we will use slightly different options:
../init-build.sh \
  -DPLATFORM=polarfire \
  -DSIMULATION=FALSE \
  -DElfloaderImage=elf \
  -DSel4testAllowSettingsOverride=True \
  -DLibSel4PlatSupportUseDebugPutChar=OFF \
  -DCMAKE_BUILD_TYPE=Debug \
  -DKernelDebugBuild=ON \
  -DRELEASE=False \
  -DUseRiscVBBL=false \
  -DKernelVerificationBuild=OFF \
  -DKernelPrinting=ON \
  -DRISCV64=TRUE \
  -DSel4testHaveTimer=OFF \
  -DUseBootEnv="bbl"
ninja
Here, we changed the ElfloaderImage option from binary to elf and added the -DUseBootEnv“bbl”= to the options. This will bundle everything we had before into a payload for the BBL. We are now ready to use Renode.
Create a file called sel4test-polarfire.resc in the root of your workspace and fill it with the following contents:
:name seL4 Test
:description Runs seL4 Test on Renode

$name?="sel4test"

using sysbus
mach create $name
$bin?=@./build-polarfire/images/sel4test-driver-image-riscv-polarfire
$dtb?=@./build-polarfire/kernel/kernel.dtb
machine LoadPlatformDescription @platforms/boards/mpfs-icicle-kit.repl

showAnalyzer mmuart0
showAnalyzer mmuart3

macro reset
"""
   sysbus LoadELF $bin
   sysbus LoadFdt $dtb 0x81000000 "earlyconsole mem=256M@0x80000000"
   e51 SetRegisterUnsafe 11 0x81000000
   u54_1 SetRegisterUnsafe 11 0x81000000
"""
runMacro $reset
Make sure that the bin and dtb variables point to the actual files. You can now run renode sel4test-polarfire.resc.
You should now see the Renode monitor window come up. Type start here and press Enter. You will see more terminal windows pop up. You should see the kernel printing in one and the user space code in the other.
First we must make a bootable SD card image. This can be done by running the make_polarfire_sd_card found in the build directory. Insert an SD card and run the script as follows, making sure to change the device path to the path of your SD card:
sudo ./make_polarfire_sd_card --device /dev/sdb
If the script was successful, you should see a Success! message at the end. You can now remove the SD card and insert it into the PolarFire SoC board.
First we must make a bootable SD card image. This requires using Yocto. Yocto is out of the scope of this tutorial but follow the directions located at the PolarFire SoC Yocto BSP site. Build the SD card image and follow the instructions for using dd to write the wic.gz image to the SD Card. Copy your sel4test image that you build to the boot partition as sel4test.
Ensure that the PolarFire SoC board is configured to boot from an SD Card and insert the SD card. At this point I like to use tmux to split a terminal into 4 parts and then use tio to connect each pane to a serial device. I run the following command to achieve this:
tmux new-session -d -s 'polarfire-serial-dashboard'
tmux split-window -v
tmux split-window -h
tmux select-pane -t 0
tmux split-window -h
tmux respawn-pane -t0 -k "tio /dev/ttyUSB0"
tmux respawn-pane -t1 -k "tio /dev/ttyUSB1"
tmux respawn-pane -t2 -k "tio /dev/ttyUSB2"
tmux respawn-pane -t3 -k "tio /dev/ttyUSB3"
tmux select-layout tiled
tmux set -g mouse on
tmux attach-session -t 'polarfire-serial-dashboard'
When you power on the board, you should see the Hart Software Services boot up in the upper left terminal. This is the software running on the monitor core. The upper right terminal will show the output from U-Boot. Make sure that you are ready with tmux to select this pane. The lower left pane will show the output from the kernel, while the last pane will show the output from the user space seL4 test application suite. When the board powers on be sure to interrupt the U-boot sequence and enter the following fatload command:
U-Boot 2020.01 (Jul 31 2020 - 14:34:52 +0000)

DRAM:  1 GiB
MMC:   sdhc@20008000: 0
In:    serial@20100000
Out:   serial@20100000
Err:   serial@20100000
Net:
Warning: ethernet@20112000 using MAC address from ROM
eth0: ethernet@20112000
Hit any key to stop autoboot:  0
RISC-V #
RISC-V # fatload mmc 0 0x80000000 sel4test; go 0x80000000
If using the SD card built with the make_polarfire_sd_card script, use the following fatload command instead:
RISC-V # fatload mmc 0:2 0x80000000 sel4test-driver-image-riscv-polarfire; go 0x80000000
You should see debug statements printing on the kernel terminal and test output in the lower right.
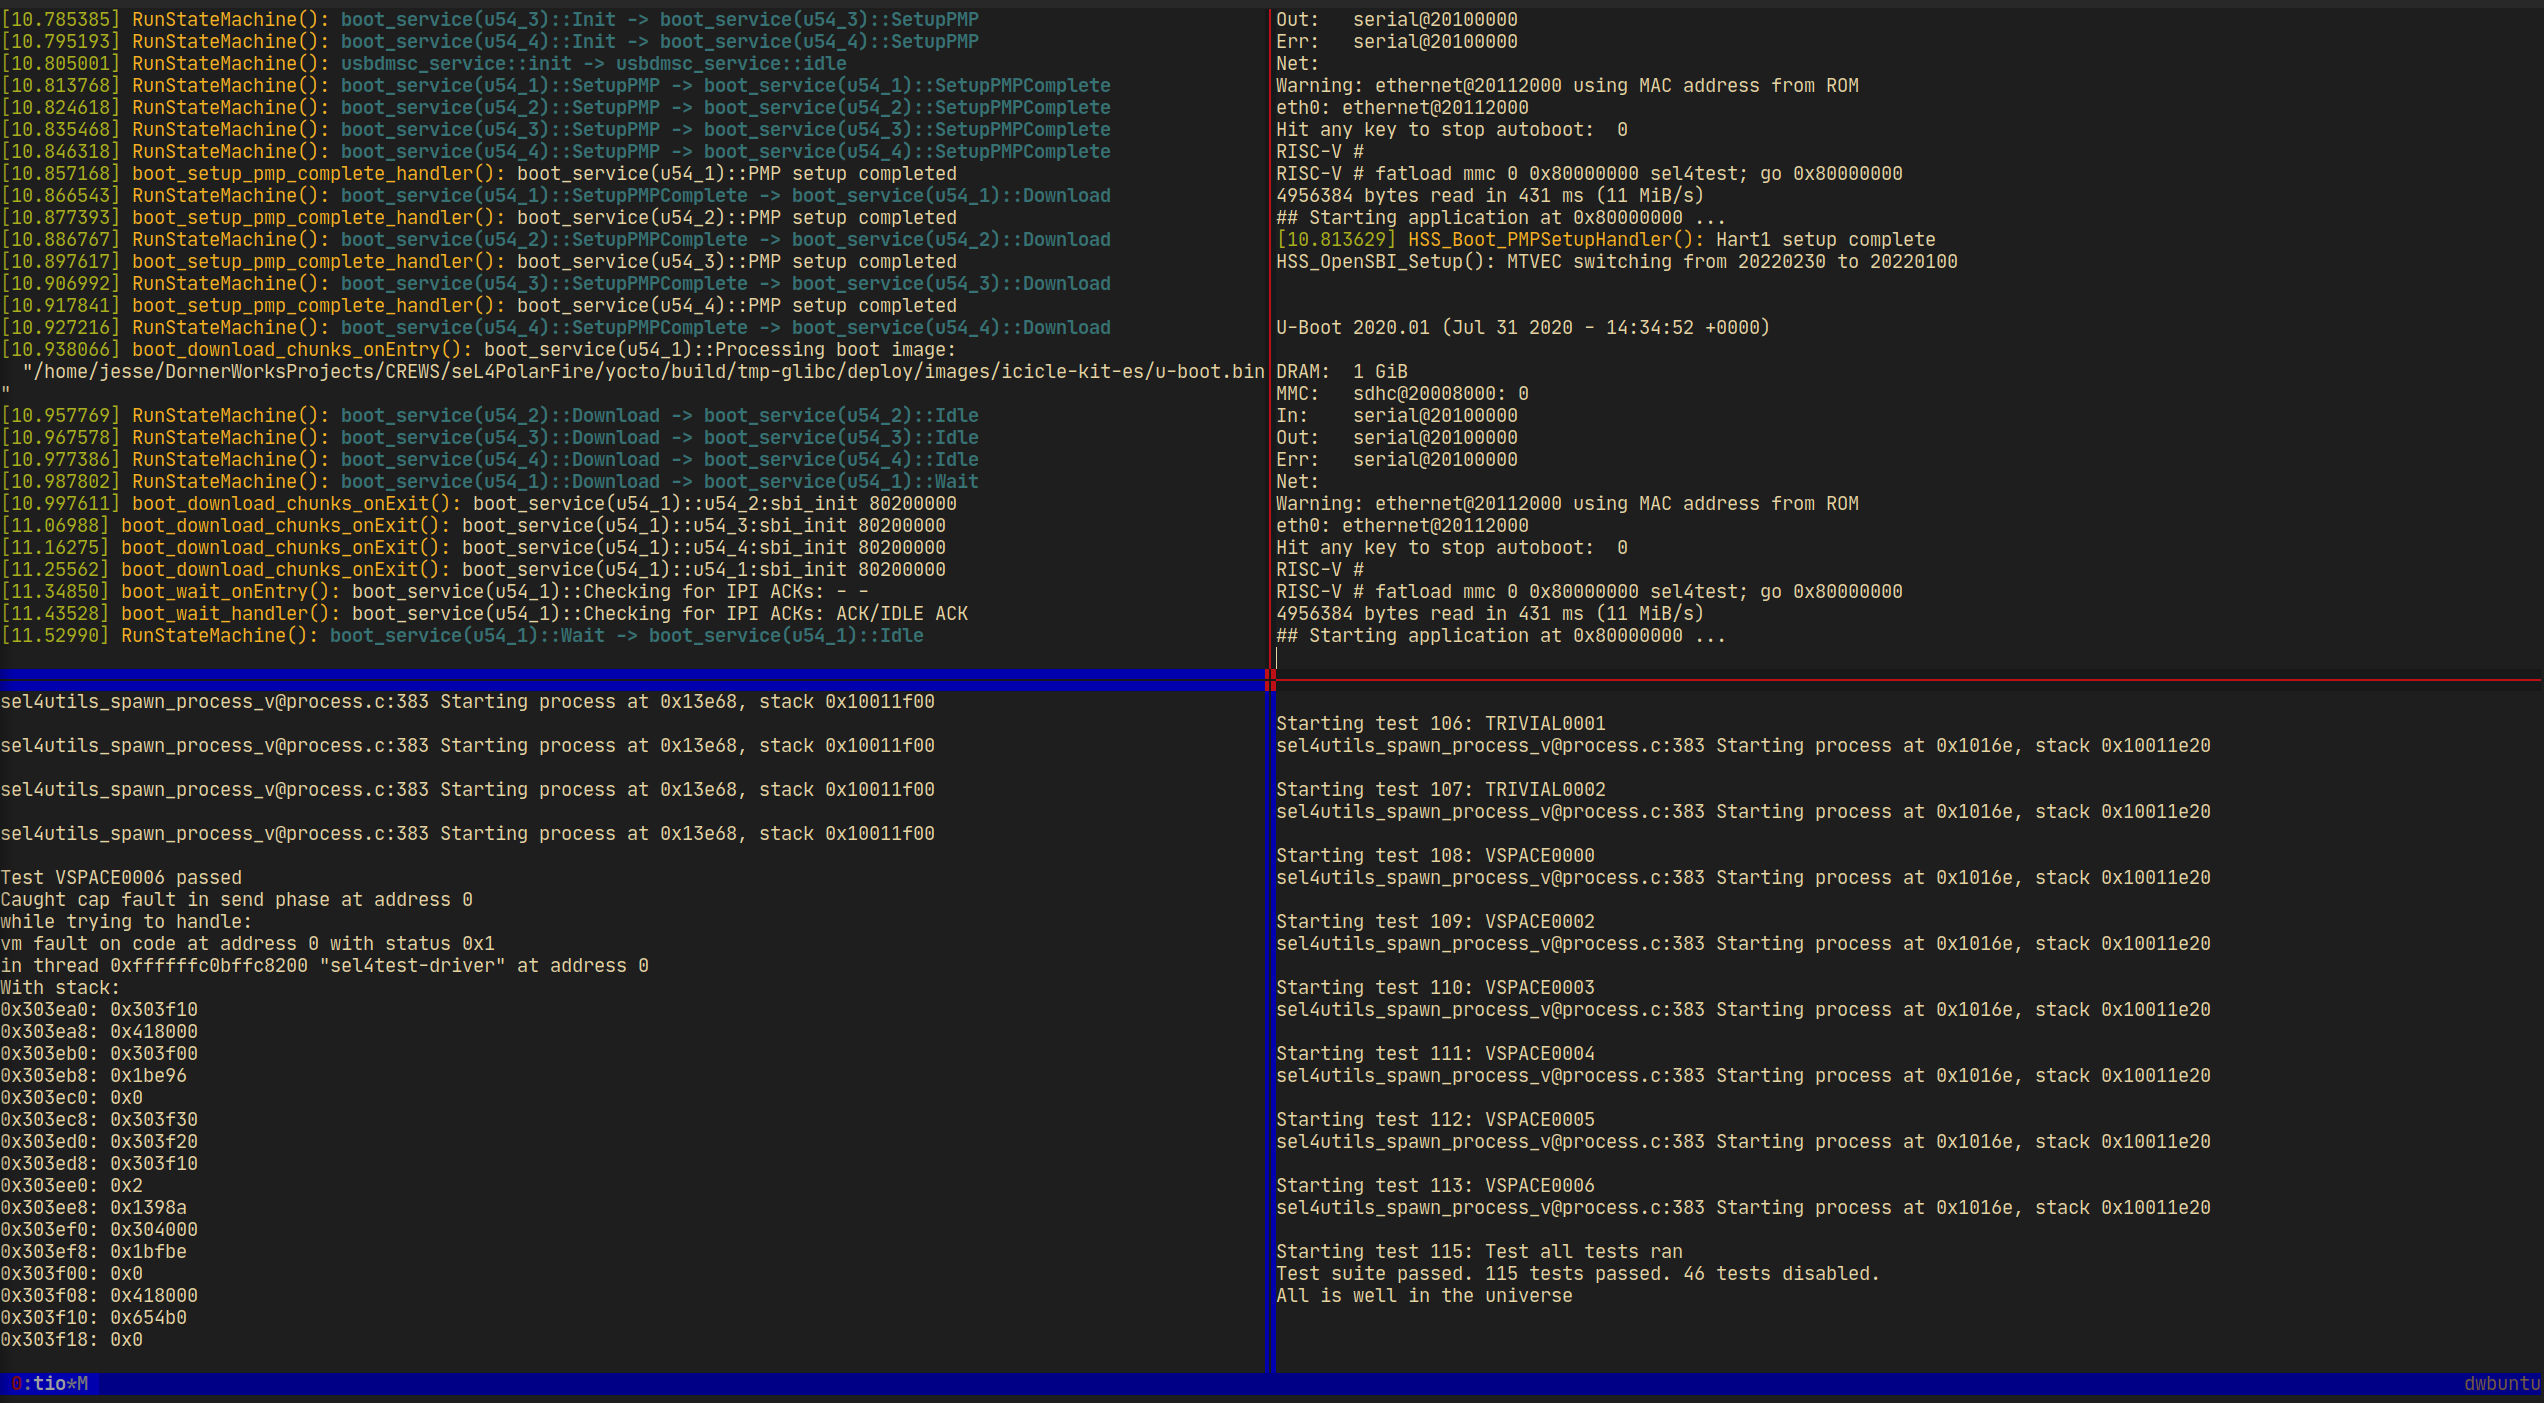
A success full test run shows “All is well in the universe” at the end.
We have a few rough edges to sand down here. First, we are working on adding functionality to the build system to make building a bootable image without yocto easy from the current build system. Second, We are working on a timer driver for the PolarFire SoC. Lastly, the platform support for the PolarFire SoC is under review by Data 61 for inclusion upstream. When the patches are accepted upstream, the only difference to these instructions will be the original sel4test-manifest link that was used.
Created: 2020-09-17 Thu 08:43